1/3 Pound Grounded Beef 1/2 Onion (Finely sliced)
3 Thai Red chillie (optional)
1 tsp Vegetable Oil
1/4 Sugar
1 tsp Curry Powder
1/8 tsp Black Pepper
1/2 tsp Salt
1 tsp Soy Sauce
1/4 Water
3 Slices Toast (or same amount of any other bread)
How:
1. First on high heat, add oil, sautee the onion with sugar
2. When onion are soften up, on low heat add ground beef curry powder, black pepper, salt
3. In the mean while, blend water with toast to make a mixture (I used magic bullet)
4. Add bread mixture and soy sauce to the pot, turn it back on high and give it a few stir to reduce moisture
5. It will be ready when its thicken up
2 Cups All-purpose Flour
1/4 tsp Salt
1/8 tsp Baking Powder
1/2 tsp Curry Powder
4 Tsp Vegetable Shortening
4 Tsp Cold Butter
1/3 Cup Cold Water
How:
1. In a large bowl, mix together flour, salt, baking powder and curry powder
2. Cut butter in small pieces, add to flour along with shortening
3. Break the fat apart in the flour, leaving small lumps is okay
4. Add cold water to make it a dough, do not over work it, as soon the dough comes together its ready to use
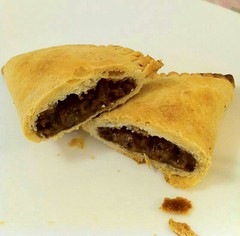
 Assemble Beef Patties: (Makes 12)
How:
1. Divide the dough into 12 pieces
2. Dust flour on working surface, roll the dough into a 0.5cm thick
3. Cut circle using a bowl, approx. 4 inches wide
4. Add 1.5 tsp beef filling, fold in half and use water to seal the edge
5. Using a fork to press the edge for a security seal
6. At 400F' Bake 20-25min (you can also freeze them raw and bake later on)
Read more...