Sunday, August 30, 2009

key01-yaaMila Pinapple Fondant Cake


w-iron04b

w-iron04b
You wonder why the cake is called Mila?
It is because this cake is for my friend Sherrie,
she has a teddy named Mila,
so this cake is named after her
This is my 2nd fondant cake,
the fondant is a lot thinner than the Chanel cake (about 2mm)
Just to make it less sweet and easier to eat,
I did not try the cake,
but it could be a bit sweet since a lot of butter cream was used in the cake


Recipe:
Sponge cake 8"
Can pineapple 1/2
Pineapple juice (save it from the can, and brush it on the sponge cake)
Butter Cream 1 cup
Fondant
Food coloring

1-Cut the sponge cake into 2 layers
2-Brush pineapple juice on the cake, spread butter cream, add pineapple chunks, continue for the 2nd layer
3-Mask the cake with the rest of butter cream
4-Cover and design your cake with fondant

DSC02026DSC02028DSC02029

Read more...

key01-yaaCoffee Mousse Cake


w-iron04b


w-iron04b
Mom's friend ordered a coffee mousse cake,
there is two layers of sponge cake and topped with whipped cream and chocolate waffle,
All her friends liked the cake,
I specially made it less sweet because middle age people don't like sweet sweet cake


Recipe:
(A)
Original Sponge Cake 1 (8")

(B)
Gelatin powder 1 1/2 Tsp
Coffee powder 2 Tsp
Hot water 1 3/4 cup
Rum 1 Tsp (optional)

(C)
Egg Yolk 1
Sugar 50g
Honey 2 Tsp

(D)
Whipping Cream 250 ml

(E)
Chocolate/ Waffle/ Fruit for decoration (optional)

1- Cut the sponge cake into 2 layers
2- Combine everything in (B), let cool to room temperature
3- Boil some water, Beat yolk and sugar in a big bowl set on top of the boiling water, till white and fluffy, remove from heat and add honey
4- Whipped the cream still stiff, fold in the yolk mixture, stir in (B) quickly
5- In a removable cake mold, place a piece of baking paper inside
6- First layer a sponge cake slice in the bottom, pour half of the mousse mixture
7- Place another layer of sponge cake, pour the rest of the mousse mixture, shake lightly so the surface is nice and smooth
8- Refrigerate for 3 hours, place a hot towel outside the cake mold and release

Read more...

Thursday, August 27, 2009

key01-yaaPanda Loaf


w-iron04b


w-iron04b


w-iron04b
This is my very first loaf of bread,
I made it without bread machine,
the texture and taste were both right,
just that the panda face is not, hehe..
I should try again whenever I finish my loaf =)
No-bread machine recipe will be posted soon


This recipe was original found here
You can see a successful panda loaf picture on the site
It also walk you throught step by step, very clear

Read more...

Friday, August 21, 2009

key01-yaaNutty Macaroons


w-iron04b


w-iron04b
I prefer not do fill chocolate ganache in between the macaroons,
because it will be too sweet and my family would not like it
So, here is a simple nutty macaroons recipe


Recipe:
Pecan+Almond 120g (grounded)
Egg whites 2
Cream of tartar 1/8 tsp
Sugar 100g
Corn starch 1 tsp
Vanilla 1 drop

1- Beat egg whites and cream of tartar on low speed, add sugar a Tsp at a time
2- Mix corn starch with grounded nut, sift
3- Fold the nut and vanilla into the egg white, do not over mix
4- Use a tea spoon and make 1" drops on a baking sheet, leaving about 1" in between each one OR in mini muffin tin (I added extra pecan on top)
5- Bake 225'F, 1.5 hr

Read more...

key01-yaaBerries Rose Meringue


w-iron04b


w-iron04b
More egg white recipe!
Berries and Rose all in one bite


Recipe:
Egg white 2 (70g)
Cream of tartar 1/8 tsp
Icing sugar 45g
Sugar 100g
Black Berry Jam 1.5 Tsp (you don't want any big chunck of fruit inside)
Rose essence 2 drops

1- Beat egg whites and cream of tartar on low speed, add sugar a Tsp at a time
2- The whites should be very stiff
3- Fold Jam, rose essence and icing sugar, just untill blended
4- Pipe mini rosa with a star tube on a baking sheet
5- Bake 225'F for 1.5 hr

Read more...

key01-yaaMocha Meringues


w-iron04b


w-iron04b
Here is another egg white recipe!
Mocha meringue is perfect for coffee time
Here is some tips: egg white would work the best in room temperature, some days old egg whites is also great too


Recipe:
Egg white 2 (70g)
Cream of tartar 1/8 tsp
Icing sugar 120g
Cocoa powder 1 tsp
Instant coffee powder 1 tsp
Vanilla 2 drops

1- Combine 1/4 of the icing sugar with cocoa powder and coffee powder, sift
2- Beat egg whites on low speed, add cream of tartar
3- Add the rest of icing sugar a Tsp at a time till the whites become glossy and stiff
4- Fold the sifted powder and mix with vanilla, do not over mix
5- Pipe mini rosa with a star tube on a baking sheet
5- Bake 225'F for 1 hr

DSC01992DSC01993DSC01995

Read more...

key01-yaaAngel Food Cake


w-iron04b


w-iron04b

With all the left over egg whites from the Tiramisu Baking Party,
I had to make something out of them!
So the first time I decided to make was Angel Food Cake..
I made only a 1/4 cake here,
If you would like to make a 3 layers cake,
please X3 of the ingredients


Recipe:
Egg whites 3-4 (100g)
Cream of tartar 1/4 tsp
Salt 1/8 tsp
Sugar 50g
Pastry flour 35g
Vanilla 2 drops

1- Use an egg beater, beat egg whites along with cream of tartar and salt, untill it is foamy
2- Add sugar a Tsp at a time, beat for about 8-10 min, the mixture will turn slivery and glossy
3- Fold in the sifted pastry flour and vanilla, just untill its blended
4- Bake 300'F 20min
5- When it cool down, you may cut the cake in quarters and layer with whipped cream and strawberries

DSC01997

Read more...

Wednesday, August 19, 2009

key01-yaaTiramisu


w-iron04b


w-iron04b


w-iron04b

The baking party was fun! Everyone got a beautiful cake and a few glasses of strawberry parfait to bring home


Tiramisu Recipe:
Whipping Cream 250ml
Egg Yolk 3-4
Honey 50g
Sugar 50g
Gelatin 10g
Mascarpone cheese 500g
Instant coffee powder 15g
Hot water 125ml
Rum 1Tsp (optional)
Lady’s fingers
Extra Whipping Cream
Cocoa powder

1-Add coffee and rum and allow to dissolve in the hot water
2-Whip 250ml cream, set in fridge
3-Boil some water, put yolk and sugar in a large bowl, set the bowl on top of the steam, beat on egg mixer until turns white, add gelatin
4-Remove from heat, add honey, stir lightly
5-Fold Cheese into the yolk mixture, then fold in whipped cream
6-Put plastic wrap in the container
7-Dip each lady’s finger in the coffee quickly, lay in the bottom of container, add a thin layer of cheese mixture, and continue
8-The top should be covered with lady’s finger
9-Store in refrigerator for 30min, unmold carefully, apply whipped cream for a nice finishing, dust with cocoa powder

Here is my friend Yinyin's chocolate panda design for her cake:

5531_128294806819_597991819_2951871_5049356_n5531_128294811819_597991819_2951872_3337769_n5531_128295776819_597991819_2951894_6924020_n


Friends Leona and Yinyin's finished Tiramisu and Parfait cup
6608_794856035252_28133842_50522840_1968465_n5531_128296911819_597991819_2951988_4687963_n5531_128294791819_597991819_2951869_5091938_n

Read more...

Sunday, August 16, 2009

key01-yaaMarshmallow Fondant Cake: CHANEL


w-iron04b


w-iron04b

This is the most complicated cake I have ever made,
but was great working with fondant,
I just feel like playing the playdoh again,
I spent 2 and a half day working on this cake for my best friend's birthday,
she loves it very much,
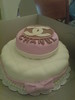
I am showing the process and some recipes of this CHANEL cake,
feel free to ask any question here

Recipes in this post: Marshmallow Fondant Recipe/ Pink Velvet Cake Recipe/ Jam Syrup Recipe/ Butter Cream Recipe/


CHANEL00

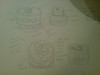
1-First, I made a couple sketches for the cake


CHANEL01CHANEL02CHANEL03

2- I follow a funny video for this homemade marshmallow fondant via instructables.com on Youtube, it turns out very delicious
But I changed the recipe a little

Fondant recipe:
Water 2tsp
Marshmallow 400g
Icing Sugar 750g

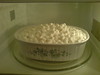
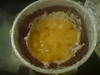
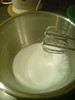
-Microwave the whole pack of marshmallow with water for 2min
-Stir for 1min or until the marshmallow melted
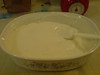
-Add icing sugar a cup at a time
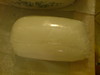
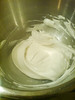
-Dust icing sugar on the work surface, work it into a dough, make sure theres no lumps
-Wrap the dough with plastic wrap and cool in the fridge for at least 30min before using
-Microwave 8 sec before using the dough, so its a lot easier to work with


CHANEL04

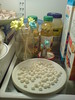
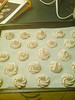
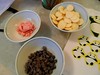
3-Add food coloring to small amount of the dough, I made some flowers and pearls out of it, refregrate for 15min, bring them back to room temperture after


CHANEL05CHANEL06CHANEL07

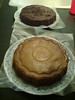
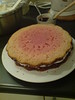
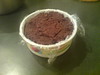
4-Okay, make one 8" devils food cake and one 8" pink velvet cake
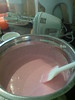
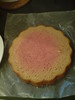
this is my Pink Velvet Cake, it was my first time making it, should have added more red coloring to the cake mixture, now only the center of the cake is pink

Pink Velvet Cake recipe:
Sugar 240g
Crisco veggie shortening 80g (room temperature)
Salt a pinch
Water 80ml
2% milk 80ml
Vanilla 2tsp
Red food coloring 4-5 drops
All purpose flour 200g
Baking powder 5g
Baking soda 2g
Eggs 2

-Cream the shorenting, sugar and salt with egg beater
-Add Sift flour and water to the shortening mixture, continue beating on low for 3min, scrape
-Gradually add eggs and vanilla
-Scrape the bowl and mix on medium speed for 1 min, stir in food coloring
-Grease the mold and dust flour on it, baking 380'F for 30-40 min
-Unmold and let cool when it comes out the oven


CHANEL08CHANEL09CHANEL10CHANEL11

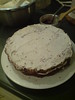
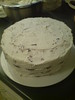
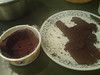
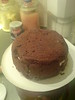
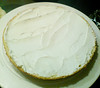
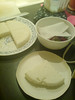
5-Step 5 is to slice each cake into 3 layers, brush jam syrup and spread butter cream on each layer, and do the same till you get 3 pink layers and 2 chocolate layers, mask the cake with butter cream, cool in the fridge for 30min, save one chocolate slice for the top tier

Jam Syrup recipe:
Blackberry Jam 3Tsp (you can use any kind of jam)
Water 6Tsp
Sugar 1tsp

-Just stir them until blended

Butter Cream recipe:
Crisco shortening 1/2 cup
Butter 1/2 cup (room tempeture)
Vanilla Extract 1 tsp
Icing sugar 4 cups
Salt pinch
Milk 2 tsp

-Cream shortening and butter
-Add vanilla, salt
-Slowly add sugar, a cup at a time, continue beating medium speed on the mixer, scrap and mix
-Add milk and beat untill fluffy
-The butter cream can be store in a airtight contianer in the freezer up to 2 months; in refrigerator up to 2 weeks. Rewhip before using.


CHANEL12CHANEL13CHANEL15CHANEL16

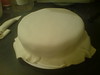
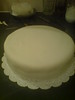
6- Now roll your fondant to 1/4" thick and lay it carefully on the cake, trim the extra fondant on the side with a pizza knief, use a clean ruler to make marks on the cake, add the pearls that were made earlier, use water as glue
It is very important, NOT to store you fondant covered cake in the fridge, it will sweat and may destory the perfect look or design on your cake
Yes, it was my first time making it, I put my cake in the fridge too, I was nervous and went on google to find solution
At the end I put the cake out within a cardboard box, it eventually come back to room temperture after 5-6 hrs, the fondant sweated but the cake itself and the box absorb back the moisture,
I believe it was because my cake was not very wet or the fondant could possiblely crack and collaps
Your left over fondant should be store in a air tight bag in the fridge; however, onces its on the cake it should stay in room temperture, thats why a lot of the people recomment to use butter cream inside a fondant covered cake


CHANEL17CHANEL18
CHANEL19CHANEL20CHANEL21

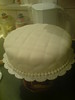
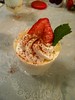
7-For the top tier, I used the left over chocolate spong. What you need to do is a find a contianer that is the size and shape u are looking for, lay a plastic wrap over
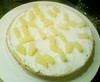
Cut the spong into strips, line it up at both the bottom and the side inside the container, brush jam syrup, spread some buttercream and add some diced peach (I just use canned peach here), do another layer and cover up with more sponge cake, press lightly
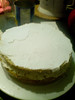
Seal with plastic wrap, let it set in fridge for 1 hr, unmold carefully and mask with more butter cream,
Last, cover it with some pink fondant and set in room tempeture


CHANEL22CHANEL23CHANEL24CHANEL25

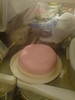
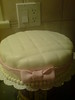
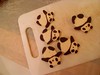
8-Almost done here, play with your fondant and food coloring, be creative, just need to finish decorating
For the brown fondant, I used some cocoa powder
Also, chocolate/candy melt work well on fondant too
Before you top your small cake on the base, you will need to find the middle point of the bottom cake, stick 3 bubble tea straws in the middle (make a triangle, all straws should be the same height as the bottom cake)

Read more...
Blog Widget by LinkWithin